Assay formats for kinetics and affinity
Information in a sensorgram
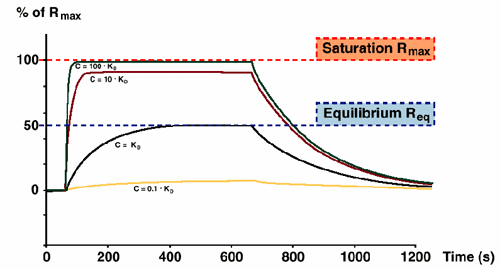
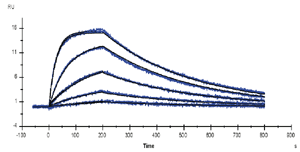
The sensorgram contains information about association and dissociation rates, and also equilibrium levels (steady-state) if a plateau is reached during sample injection.
Plateau levels Req at high analyte concentrations approach maximum binding capacity Rmax (100x KD or higher). KD is the analyte concentration that gives half-maximal saturation (Req = Rmax/2).
It is important to note that Req can be reached at several levels depending on the concentration. It is however only when the Req = Rmax/2 that the concentration equals KD.
Difference between affinity and kinetics
Affinity does not always tell the entire story. Interactions with the same affinity may have entirely different kinetic rate constants, which could have an impact on the biological significance and behavior.
Compounds with slow dissociation rate (such as the red and yellow curves in the figure below) occupy the target for a longer time. The analyte concentration in the right overlay plot is ten times higher than in the left plot. This shows that the increase in concentration affects the association phase, while the dissociation phase is independent of the concentration. Rmax (when all binding sites are occupied) is reached for all curves except for the red one at the higher concentration. The figure below also shows the difference between Rmax and Req. In the left plot, the plateau that is reached by the black and green curves represents the equilibrium level, while the plateau for the same curves at the higher concentration represents the Rmax level.
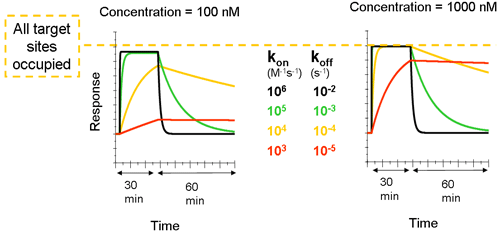
This figure also shows the difference between Rmax and Req. In the left plot, the plateau that is reached by the black and green curves represents the equilibrium level, while the plateau for the same curves at the higher concentration represents the Rmax level.
Measure kinetics and affinity in Biacore
There are three ways to obtain kinetic and affinity data in Biacore:
- Monitor association and dissociation rates
Analyzing association and dissociation rates for a series of analyte concentrations gives kinetic information which can also be expressed as affinity and steady state does not have to be reached. - Monitor steady state levels
Analyzing steady state levels as a function of analyte concentration gives affinity values but not kinetics. It is useful for fast on-fast-off interactions where kinetics cannot be determined. Limited usefulness for slower reactions because of the time taken to reach steady state. - Measure free analyte in solution
Measures affinity in solution: allow mixtures of interactants to reach equilibrium in solution and use Biacore to measure the concentration of free analyte in the mixtures. It can be applied to situations where direct measurement may be difficult (small molecules, interactions that are disturbed by ligand immobilization etc) and to obtain solution values for comparison with surface-bound values.
 Kinetics and affinity |
 Affinity only
|
To determine kinetic parameters for an interaction in Biacore, binding is measured at a series of analyte concentrations and the resulting data is fitted to a mathematical model of the interaction. The most firmly established experimental format runs each analyte concentration in a separate cycle, regenerating the surface after each cycle (multi-cycle kinetics). More recently, an approach has been developed that injects all analyte concentrations in sequence in a single cycle, regenerating the surface if desired only at the end of the whole analysis (single-cycle kinetics). Single-cycle kinetics enables kinetic analysis for ligands that cannot be regenerated.
Multi-cycle kinetics
|
In the multi-cycle approach to kinetic analysis, each sample concentration is injected in a separate cycle and the surface is regenerated (either by spontaneous dissociation or by in injection of regeneration solution) between cycles. The recommended assay set-up analyzes at least 5 analyte concentrations, at least one of which should be run in replicate as a check that the assay performance is consistent. |
 |
One or more zero-concentration samples. i.e. buffer, are also recommended to allow for double-referencing. This procedure subtracts the zero-concentration sensorgram (or the average of multiple zero-concentration sensorgrams) from the other curves in the data set to correct for artifacts that are not eliminated by reference subtraction. Double-referencing improves the robustness of the kinetic analysis, particularly when the response levels are low.
Efficient regeneration is important for multi-cycle kinetics since the surface properties should ideally be identical for each analysis cycle. If material accumulates on the surface or the ligand is damaged by regeneration, evaluation will be more complicated and may not be reliable.
For ligands that cannot be regenerated, multi-cycle kinetics can only be used with a capture approach, attaching fresh ligand to the surface for each cycle. If neither regeneration nor capture conditions are available, interaction kinetics cannot be determined with the multi-cycle approach.
Single-cycle kinetics
|
For single-cycle kinetics, the sample concentrations are injected in sequence in the same cycle, with no regeneration between injections. There is a short dissociation period between injections and a longer dissociation phase after the last injection. Unless dissociation is very rapid, analyte accumulates on the surface so that each injection starts from a new analyte level. Five analyte concentrations are recommended, injected in order of increasing concentration. |
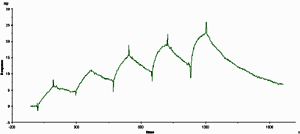 |
Replicate concentrations are not used since the surface conditions are different for each injection. Double-referencing is recommended, and requires a full cycle with a zero-concentration injection corresponding to each sample injection.
Regeneration is not used between sample injections, and is only required at the end of the experiment if the surface is to be used for new measurements. Analysis can therefore be performed using ligands for which regeneration conditions cannot be found.
With a capture approach, ligand is injected once at the beginning of the analysis cycle. Ligand consumption is thus reduced considerably compared with multi-cycle kinetics using capture. However, single-cycle kinetics makes more stringent demands on the stability of the capturing interaction, because of the relatively long duration of the single analysis cycle.
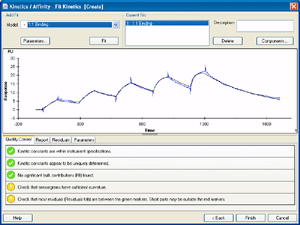
Evaluation
|
Evaluation of kinetic analysis experiments involves fitting the data to a mathematical model of the interaction. The equations describing the model are independent of how the assay is set up, and the same model can in principle be used for single- and multi-cycle kinetics. In Biacore systems with integrated support for the single-cycle format, the same fitting algorithm handles both single- and multi-cycle data. All interaction models can be applied equally to both formats. In older systems where single-cycle kinetics is not explicitly supported, appropriate models need to be defined in the evaluation software1. |
 |
1 R. Karlsson, P. S. Katsamba, H. Nordin, E. Pol and D. G. Myszka (2005), Analytical Biochemistry 13, 136-47.
Single-cycle kinetic experiments are supported in the Custom Assay wizard in Biacore X100. This wizard is provided as part of the optional Biacore X100 Plus Package. Use the surface preparation and assay development wizards as necessary to establish appropriate conditions for ligand immobilization or capture.
This article describes how to set up a single-cycle kinetics assay using the Custom Assay Wizard in Biacore X100.
1.) In the Control Software, choose Other Options, then Wizards. Select the Custom Assay Wizard.
2.) Click Biacore Templates and select the template for Single Cycle Kinetics. This template contains recommended settings for a typical run, with a suggested analyte concentration series covering analyte concentrations of 2.4 to 1500 nM in 5-fold dilution steps.
|
3.) Required settings in the first wizard dialog are Flow cell 1,2 with reference subtraction and Evaluation purpose Kinetics/Affinity. Change the Chip type setting if you want to use a sensor chip other than CM5. |
 |
|
4.) The cycle definition in the next step holds one sample command, set up for single-cycle kinetics with 5 concentrations per cycle. The flow path must be set to Both. Other settings are recommendations: you may want to adjust the contact time, dissociation time and flow rate to suit your particular experiment. Flow rates below 30 µl/minute are not recommended for kinetic analysis. |
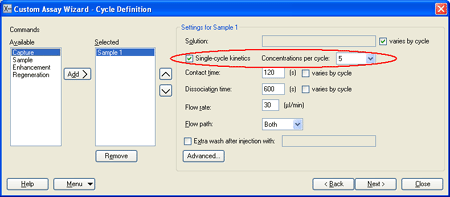 |
You may add other commands to the cycle definition if you wish:
- Add a Capture command before the Sample command if you want to attach your ligand by capture. Immobilize capturing molecule in both flow cells (using the Immobililzation wizard) and set the flow path for the Capture command to Second, so that flow cell 1 is used as a reference with capturing molecule but no ligand.
- Add a Regeneration command after the Sample command if you want to inject regeneration solution at the end of the cycle to prepare the surface for a new interaction. The flow path for regeneration can be set to Both. Set the other parameters for your additional commands as required by your particular assay.
5.) Accept the default report point settings in the next dialog. There will be report points just before and just after the end of each sample injection, in addition to a baseline at the beginning of the cycle and other report points for additional commands that you have included in your cycle definition.
|
6.) The sample table is set up with a startup cycle using buffer to allow the response to stabilize, followed by two zero-concentration cycles and one analyte cycle. Two zero-concentration cycles are recommended to ensure that at least one can be used, since double-referencing improves the quality of single-cycle kinetic data quite significantly. You can save time by deleting one of these cycles but you then risk compromising the data quality. Adjust the sample name and analyte concentrations according to your requirements. The suggested concentration range (2.4–1500 nM) covers the requirements for many protein-protein interactions. |
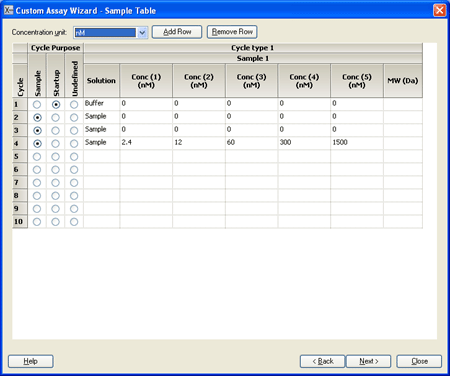 |
In general, you can use a wider concentration range for single-cycle kinetics than you would for multi-cycle kinetics, increasing the chance of getting useful data from the first trial run.
Note that the zero-concentration samples should have the same sample name as the analyte cycle. This ensures that they are correctly recognized by the evaluation software.
This article describes how to evaluate single-cycle kinetics experiments in Biacore X100.
|
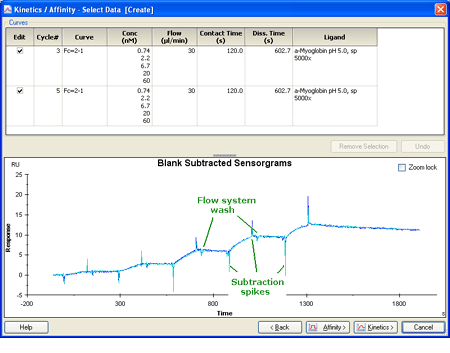
1.) Open the results in the evaluation software and check the general data quality as recommended in the Support Navigator. Note that the reference subtracted sensorgram will often show significant subtraction spikes at the beginning and end of each injection. Do not discard the sensorgrams as "bad" on the grounds of these spikes: they are normal and will be removed if necessary during the kinetic evaluation. |
|
|
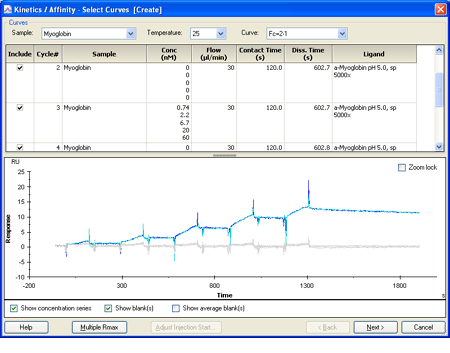
2.) Click Kinetics/Affinity in the main toolbar. The first step shows the cycles with their respective analyte concentration series. |
 |
|
3.) Select and remove spikes and disturbances from the double-referenced curves. You will for example probably see a regularly recurriung disturbance in the sensorgram after each injection, corresponding to the automatic wash routines. Remove these disturbances for best results. |
 |
|
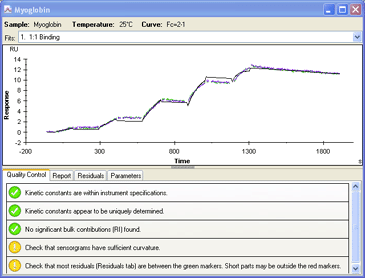
4.) Fit the data to an appropriate interaction model. |
 |

Panel 2 header
Lorem ipsum dolor sit amet, consectetur adipisicing elit. Repellendus aliquid tempore natus voluptates repudiandae, eos dolorem libero inventore, quod incidunt, asperiores. Reiciendis itaque enim pariatur, blanditiis minima autem quo a nulla, obcaecati quis, excepturi atque ab rerum! Sequi molestias vel eum, hic, perspiciatis eius suscipit reprehenderit molestiae vitae similique.
Panel 3 header
Lorem ipsum dolor sit amet, consectetur adipisicing elit. Repellendus aliquid tempore natus voluptates repudiandae, eos dolorem libero inventore, quod incidunt, asperiores. Reiciendis itaque enim pariatur, blanditiis minima autem quo a nulla, obcaecati quis, excepturi atque ab rerum! Sequi molestias vel eum, hic, perspiciatis eius suscipit reprehenderit molestiae vitae similique.

Panel 4 header
Lorem ipsum dolor sit amet, consectetur adipisicing elit. Repellendus aliquid tempore natus voluptates repudiandae, eos dolorem libero inventore, quod incidunt, asperiores. Reiciendis itaque enim pariatur, blanditiis minima autem quo a nulla, obcaecati quis, excepturi atque ab rerum! Sequi molestias vel eum, hic, perspiciatis eius suscipit reprehenderit molestiae vitae similique.
Panel 4 header 2
Lorem ipsum dolor sit amet, consectetur adipisicing elit. Repellendus aliquid tempore natus voluptates repudiandae, eos dolorem libero inventore, quod incidunt, asperiores. Reiciendis itaque enim pariatur, blanditiis minima autem quo a nulla, obcaecati quis, excepturi atque ab rerum! Sequi molestias vel eum, hic, perspiciatis eius suscipit reprehenderit molestiae vitae similique.
Panel 5 header
Lorem ipsum dolor sit amet, consectetur adipisicing elit. Repellendus aliquid tempore natus voluptates repudiandae, eos dolorem libero inventore, quod incidunt, asperiores. Reiciendis itaque enim pariatur, blanditiis minima autem quo a nulla, obcaecati quis, excepturi atque ab rerum! Sequi molestias vel eum, hic, perspiciatis eius suscipit reprehenderit molestiae vitae similique.
Panel 5 header 2
Lorem ipsum dolor sit amet, consectetur adipisicing elit. Repellendus aliquid tempore natus voluptates repudiandae, eos dolorem libero inventore, quod incidunt, asperiores. Reiciendis itaque enim pariatur, blanditiis minima autem quo a nulla, obcaecati quis, excepturi atque ab rerum! Sequi molestias vel eum, hic, perspiciatis eius suscipit reprehenderit molestiae vitae similique.
Panel 5 header 3
Lorem ipsum dolor sit amet, consectetur adipisicing elit. Repellendus aliquid tempore natus voluptates repudiandae, eos dolorem libero inventore, quod incidunt, asperiores. Reiciendis itaque enim pariatur, blanditiis minima autem quo a nulla, obcaecati quis, excepturi atque ab rerum! Sequi molestias vel eum, hic, perspiciatis eius suscipit reprehenderit molestiae vitae similique.